When converting your tub to a shower, follow these 6 foolproof tips.
Imagine a spacious shower with no slippery porcelain hump to step over … and no more battles with the shower curtain each time you shampoo. And maybe a bench, too? Sounds heavenly.
But a tub-shower conversion is a financial commitment — and you don’t want to make a pricey mistake.
Here are some tips to ensure you’re not dumping your money instead of your tub.
#1 Don’t Eliminate Your Only Tub
Even if you only use your tub to wash the mini-blinds, most real estate agents are adamant about having at least one bathtub in your house to preserve marketability.
A recent Houzz poll agrees, with 58% of respondents claiming, “you’ll never sell that house without a tub.”
The reason: many home buyers need a tub for small children.
(Of course, this is just advice, so if your heart is set on a shower-only home, by all means do it. That’s why you own a home, so you can do what you want. Enjoy and read on …)
#2 A Kit Is Your Best Low-Cost Option
{{ include_comparison_image 51 }}
If your old tub is in an alcove, you can remove it and be left with a space that’s about 30 to 34 inches deep and 5 feet wide — which is a good space for a shower. With minor modifications, your water supply and drain lines will already be in place, saving you money on plumbing costs.
Shower stall kits are fantastic low-cost options, made to fit into corners and old bathtub alcoves. They’re typically made of acrylic or fiberglass, and include pre-made sides, a skid-proof floor pan with curbs and a drain hole, and a hinged glass door. Some include extras such as built-in seats and shelves for bath products. Cost is $200 to $2,000, depending on options.
If you want a custom tile shower, the cost jumps quite a bit. Usually around $1,000 to $3,500 depending on complexity, size, and the type of tile and fixtures you choose. Add another $500 to $1,000 for tear-out, new plumbing pipes, fixtures, and any custom carpentry.
#3 Don’t Build Around a Window
If your tub is just a tub, and it’s under a window, things might get a bit complicated if you want to do this the right way.
Because you really should avoid having a window in your shower. Seriously. There are just too many opportunities for water to seep into your walls through the window casing. Then you are talking yucky, yucky mold.
And serious house damage.
You might even have to tear out your new shower. That will suck.
So play it safe. Put your shower where there is no window. Or close up the window.
But you’ll still want to have the shower as close as possible to the existing water supply and drain lines to minimize plumbing costs.
#4 Choose the Right Size
{{ include_comparison_image 52 }}
Most building codes say the floor of a shower stall should be at least 30-inches-by-30 inches. A 36-inch-by-36-inch-wide stall is recommended by the National Kitchen and Bath Association (NKBA). If you’re building to the NKBA standards, an existing tub alcove probably needs modification — such as adding short sections of wall — to make the finished shower space 36 inches deep.
Related: A DIYer Regrets Not Putting More Space in Her Shower
Other key measurements:
Finished ceiling height: At least 80 inches.
Distance from side of toilet to shower wall: 15 inches minimum measured from the center of the toilet to the wall; 18 inches is recommended.
Distance from front of toilet to shower wall (or any wall): 21 inches minimum measured from the front of the toilet bowl to the wall; 30 inches is recommended.
Shower door swing: Should clear all obstructions, especially the toilet and vanity cabinet. Sliding glass doors or shower curtains can help solve door swing problems.
Related: Don’t Make These Common Remodeling Mistakes
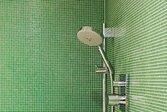
#5 Focus on the Shower Floor (It’s Crucial)
{{ include_photo tub-shower-conversion-white-tile }}
The floor of your shower (aka the shower pan) has a lot to say about the style and cost of your conversion. You have a choice of two basic types of pan: one corrals water with curbs that you step over as you enter; the other is curbless.
Shower pans with curbs form a complete enclosure to contain water spray and channel it to a drain. The floor of the shower pan has the proper pitch to drain water. Showers with curbs are usually easier — and cheaper — to install than curbless installations.
Curbless shower stalls (aka barrier-free showers) are very au courant but trickier to make — the drainage slope of the floor has to be built below the level of the surrounding flooring surface. That means either raising the level of the surrounding floor, or lowering the shower pan.
If you raise the bathroom floor, it’ll be higher than any other floor that it meets, such as the floor of your master bedroom. You’ll need a transition threshold, which can be awkward and defeats the advantage of curbless shower if you’re wanting to be able to roll in a wheelchair.
#6 During Demolition, Check These Things
The condition of existing pipes and replace if necessary.
The framing and subfloor for mold, mildew, and rot, and repair as needed.
The shower valve — now is the time to upgrade to a single-handle, pressure-balancing valve that controls temps and volume ($100 to $160).